
For this activity, you are going to experiment with the conditions that affect how much groundwater certain types of soil can absorb.
Lesson Plan
Earth-observing satellites like the Joint Polar Satellite System (JPSS) help scientists measure land surface temperature, soil moisture, and precipitation daily – important data for farmers and home gardeners!
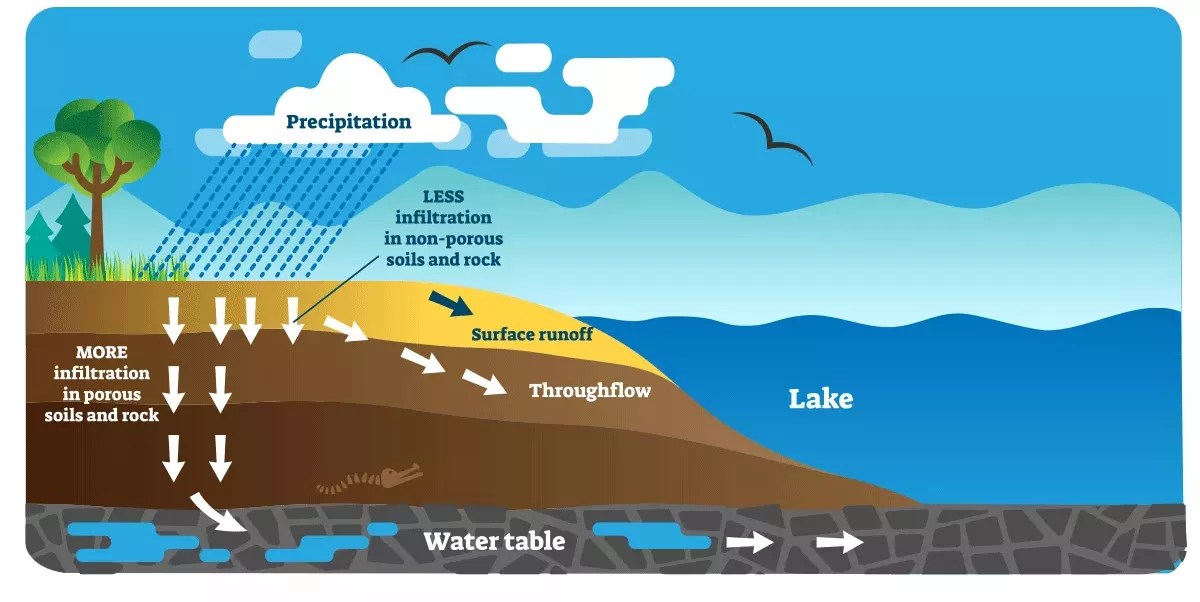
For this activity, you are going to experiment with the conditions that affect how much groundwater certain types of soil can absorb. Groundwater is water that is stored in the tiny spaces, called pores that are found in rock. The type of the rock dictates how much water can be stored due to the porosity and permeability of the rock. Porosity is the percentage of the total volume of rock or sediment that consists of pore spaces or open holes. Pore space depends on the size and shape of grains, how the grains are packed together, the degree of sorting in the rock and the amount of cement holding the minerals together. If you imagine a sponge, the holes in the sponge are what make it porous. A sponge would be able to hold more water than a block of wood because it has more holes. A block of wood still has more porosity than a chunk of glass. Permeability is the ability of a material to transmit fluid. Sometimes rocks contain many holes, but the holes are not connected. If the rock can store water but doesn’t allow the water to move through, it has a low permeability. If the rock allows water to move freely, then it has a high permeability.
Materials
You will need
- Small paper cups
- Sand
- Small gravel
- Large gravel
- Soil
- Toothpick, nail or another object you can poke holes with
- Access to water
- Measuring cups
- Optional: Grape flavored powdered drink mix prepared without sugar
Exploring Porosity and Permeability
- Take six small cups and:
Fill one with large gravel
Fill one with small gravel
Fill one with sand
Fill one with a mixture of gravel and sand (shake it so it mixes)
Fill one loosely with soil
Fill one with soil and press it down so it’s packed in.
- Look at your sand, soil and gravel cups and guess how much water will fit in each cup without overflowing. Make your guesses in milliliters Use the chart below to keep track of your results.
- Use a graduated cylinder to slowly pour water into the cups. Watch how long it takes for the water to sink in. Keep track of how much water fits in each cup by marking it on the chart below.
- Which material absorbed the most water?
- Which cup of sediment has the highest porosity?
- Which cup of sediment has the highest permeability?
| Material Type | Large Gravel | Small Gravel | Sand | Gravel and Sand | Soil | Packed Soil |
|---|---|---|---|---|---|---|
| Predicted mL Absorbed | ||||||
| Actual mL Absorbed | ||||||
| High porosity? | ||||||
| High permeability? |
- Do you think clay has high porosity or permeability?
- How would using wet materials change your results?
- How does the soil type effect the results?
- Choose five new cups. Poke five small holes in the bottom of the small cups.
Fill one small cup with a layer of sand and then top with soil.
Fill the other small cup with just soil.
Fill the other small cup with just sand.
We are going to use grape flavored powdered drink mix with debris in it to represent polluted water. What will happen when you slowly pour the leachate through the cups? How much material will be filtered? What color will it be? Write a hypothesis in the table below.
| Material Type | Hypothesis | Results |
|---|---|---|
| Soil | ||
| Sand | ||
| Sand and Soil |
Hold the small cup over a container, a sink or outside and very slowly pour your “polluted water” into it. (If you don’t pour slowly the soil will overflow and make a mess.) Record your results in the table above.
What happens if you pour the filtered “polluted water” from the soil cup through the soil a second time?